BiG3 Page & July R0CK Funnel (step-by-step)
 The step-by-step...
1) Open a new browser tab and log into AIOP.
2) TOOLBOX tab, select... Splash Builder.
3) Splash builder page, select... splash pages.
4) find the box "splash page name" and type in... big3
5) Click button to... create splash page
6) Will open to 'template manager' page... scroll down and find the plain white (empty page) option that says... ADVANCED USERS ONLY!!
7) Below that page option you will see 'empty page' and a small circle... click in the circle to select that option... scroll to the bottom of the template builder page and find the 'update template' button...
8) Click 'update template' and you will notice the page refresh.
9) Go back up to top left and Click on 'splash pages' text link.
10) Where you see your big3 page listed... Click 'edit page'.
11) Now you should be on the Splash Page Settings page.
12) Middle of the page (on the left) you will see Meta Tags and then info boxes for... Title, short description and keywords and you will type RocktheBizOps into all 3 boxes. DO NOT LEAVE EMPTY
13) Scroll to bottom of template page and click button... 'Update settings'.
14) Stay on the same page in AIOP... and click here => Pexels.com
15) *No need to create an acct.! in the 'search box' type: guitar black.
16) Look on the right, third picture down should match this picture... 

15) Click on the image @ Pexels to open it up.
16) Now, top right (green button) DROP DOWN ARROW select size 'large' and then down to the green button and download. Note: ignore the pop-up, share, etc... just wait until you see the notification that the image has downloaded and...
17) Now, open the download... right click and save to your 'images' Note: You may want to re-name the pic. as guitar black?..
18) Exit Pexels.
19) In your AIOP page settings (page)... middle of the page... find the 'Change Picture' button and click to open.
20) Near top center find Choose category: and in the drop down
select... 'your uploaded pictures' (top option)... and then click the 'select' button on the right.
21) Scroll down to bottom of the page and on the right, click the button that says... 'upload your own pictures'.
22) On this page... top left area find and click the button... 'choose file'.
23) On your system or device.... find and select your 'guitar black' pic.
24) then (same spot in AIOP) click the other button to... 'upload file'.
25) Scroll down the page in AIOP and you will see your image uploaded.
26) Scroll back to top of page in AIOP and click 'Go back to change picture'.
27) Again... 'Choose category'... then select 'your uploaded pictures'... actually 'click' the select button...
28) In AIOP and in 'your pictures'... find the guitar black pic.
29) Click in the little 'circle' to select the picture.
30) Scroll down to bottom page (left) and click button to... 'update picture'.
31) Your guitar black picture should display (larger size) up top.
32) Scroll back to bottom and this time click on... 'Go back to edit page'.
33) Now, back on the 'spalsh page settings' page... you should see the pic displayed (center).
34) Scroll down to bottom (left) and click on... 'update settings'.
VERY IMPORTANT: ALWAYS CLICK 'UPDATE SETTINGS' ANY TIME YOU ARE MAKING ANY EDITS. IF NOT... YOU RISK LOSING ALL UNSAVED WORK IF YOU 'TIME OUT'.
35) Back near top center you will see the button for 'View your splash'... Click it... DO NOT PANIC!!. the image will look 'wonky' and over-sized... it will auto-correct itself within our next steps!!
36) At the moment your page image looks like this... (and it's Ok!!).


39) On this same settings page, scroll to text editor section and the tools bar... click on the HTML icon to open it up... SEE BELOW

40) This will open the 'HTML Source Editor'.
41) Now... you will need to copy and paste (as plain text!) the entire code you will see BELOW into the HTML Source Editor...
- Be sure you copy the code below exactly.
- Be sure your cursor is in the very top left corner in the editor.
- Be sure you paste the code as 'plain text'.
- and then scroll down bottom left and click... 'update'
and then...
- Be sure to also click 'update settings' (again) on the settings page.
--------------------------HERE'S THE CODE:----------------------------
<h2 style="caret-color: #ffffff; color: #ffffff; font-family: Tahoma, Geneva, sans-serif; text-align: center; font-size: 45px; padding: 10px; margin: 0px; text-shadow: #000000 2px 2px 4px;"><span style="font-size: 70px; color: #ea0000;"><span style="font-size: 90px; font-family: impact, chicago;"><span style="font-family: impact, chicago;"><span style="color: #df0e00;"><img src="https://blogger.googleusercontent.com/img/b/R29vZ2xl/AVvXsEgsomRE1X2udKGLb6tdUPxKu_gSj5ROIcwsyHj02W1PKTUJ_C2ZCKt93dXJVOc7pQpkLI86rLn6XRfc1C6FdC2K8v1Sx3qTqKdefqR4qSKYZUcsmaH14qEFi44BbBXHSjPec8VVMZdbKlA/s1600/rockicon200.png" alt="rock201" width="201" height="41" /></span></span><br /><span style="font-size: xx-large; font-family: tahoma, arial, helvetica, sans-serif;"><span style="color: #ffffff;">Rockstar! <strong>B<span style="font-family: georgia, palatino;">iG</span></strong></span><span style="color: #df0e00; font-family: georgia, palatino;">3</span> <span style="color: #ffffff;"><span style="text-decoration: underline;">100<span style="font-family: georgia, palatino;">%</span> Commission</span> Programs</span></span></span></span></h2>
<h1 style="padding: 15px; margin: 0px; text-shadow: rgba(0, 0, 0, 0.4) 0px 1px 0px; text-align: center;"><span style="color: #ff0000; font-family: tahoma, arial, helvetica, sans-serif;"><span style="font-size: 36px;"><span style="color: #000000;"><span style="color: #ffffff; font-size: large;">Our Prime and*Required Program is AllInOneProfits (AIOP)</span><br /><span style="font-size: small; color: #ffffff;"><span style="color: #c0c0c0;">This funnel is powered by AIOP</span> <span style="color: #c0c0c0;"><strong>-</strong> <strong>Easy<span style="color: #fe0500;">1</span></strong>up and SimpleFreedom are optional.</span></span></span><br /><span style="color: #000000; font-size: large;"><span style="color: #ea0000;">Note:</span> <span style="color: #ffffff;">Already in AIOP? You are welcome to join us via Easy<span style="color: #ea0000;">1</span>up or SimpleFreedom.<br />Pick your start, Sign up & Join our FaceBook Group <span style="color: #3366ff;"><a href="https://www.facebook.com/groups/RocktheBizOpsTeam/" target="_blank"><span style="color: #3366ff;">CLICK HERE..</span></a>.</span></span></span></span></span></h1>
<table style="margin-left: auto; margin-right: auto;">
<tbody>
<tr>
<td> <img style="color: #999999; font-size: x-large;" src="https://i.imgur.com/nTLEmyw.png" alt="" width="315" height="110" /><span style="font-size: x-large;"> <br /></span><a style="font-size: x-large;" href="https://allinoneprofits.com/rotator.php?id=st3v3n" target="_blank"><img src="https://i.imgur.com/b6Sl6Mw.png" alt="" width="375" height="100" /></a></td>
<td>
<p> <img src="https://blogger.googleusercontent.com/img/b/R29vZ2xl/AVvXsEhLqZ4wNwYaJWTs90n9d901EHP0NdtFeNJSYFti4EFdvTjgFCj37zR1ozLDdyWU0dRrAFXAFAGDzz3XXf-Z0tyAvqbprYRwpG9EypomSlCFEaROdsVKgxtlaGVmKrfvJSrdfQ3PyQjXHwDW/s16000/simplefreedom475header.png" alt="sfc2" width="314" height="103" /><span style="color: #999999;"><a style="font-size: x-large;" href="https://allinoneprofits.com/rotator2.php?id=st3v3n" target="_blank"><br /><img src="https://i.imgur.com/b6Sl6Mw.png" alt="" width="375" height="100" /></a></span></p>
</td>
</tr>
</tbody>
</table>
<p style="text-align: center;"> <img src="https://i.imgur.com/ZFbtf9s.png" alt="" width="346" height="116" /> <br /><span style="color: #999999;"><a style="font-size: x-large;" href=" https://allinoneprofits.com/rotator.php?id=st3v3n2" target="_blank"><img src="https://i.imgur.com/b6Sl6Mw.png" alt="" width="375" height="100" /><br /></a></span></p>
<h1 style="text-align: center; padding: 15px; margin: 0px; text-shadow: rgba(0, 0, 0, 0.4) 0px 1px 0px;"><span style="color: #ff0000; font-family: tahoma, arial, helvetica, sans-serif;"><span style="font-size: 36px;"><span style="font-size: x-large;"><span style="font-size: xx-large;"><span style="color: #ffffff;"><span style="color: #df0e00; font-family: arial, helvetica, sans-serif;"><span style="font-size: x-large;">Simple starts here</span>...</span><br /><em><img src="https://blogger.googleusercontent.com/img/b/R29vZ2xl/AVvXsEgsomRE1X2udKGLb6tdUPxKu_gSj5ROIcwsyHj02W1PKTUJ_C2ZCKt93dXJVOc7pQpkLI86rLn6XRfc1C6FdC2K8v1Sx3qTqKdefqR4qSKYZUcsmaH14qEFi44BbBXHSjPec8VVMZdbKlA/s1600/rockicon200.png" alt="leadersnip" width="201" height="41" /></em></span></span></span></span></span></h1>
<h1 style="text-align: center; padding: 15px; margin: 0px; text-shadow: rgba(0, 0, 0, 0.4) 0px 1px 0px;"><span style="color: #3366ff;"><a title="teamfacebook" href="https://facebook.com/groups/rockthebizopsteam" target="_blank"><span style="font-family: tahoma, arial, helvetica, sans-serif; font-size: large; color: #3366ff;">@RocktheBizOps Team Build, since 2019</span></a></span></h1>
<p style="text-align: center;"><span style="color: #999999;"><span style="font-size: 42px; color: #ffffff;"><span style="font-family: tahoma, arial, helvetica, sans-serif;"><span style="font-family: 'trebuchet ms', geneva;"><span style="font-family: tahoma, arial, helvetica, sans-serif;"><span style="font-size: 100px;"><span style="font-family: impact, chicago;"><span style="color: #ffffff;"> </span></span></span></span></span></span></span></span></p>
--------------------CODE ENDS ABOVE THIS LINE------------------
42) Once you 'update settings' (again) Scroll up and click the 'View your splash page' button... and your page will look like this...

43) Notice how the 'image' has auto-adjusted itself.
44) Now... in your browser, go to the tab where your AIOP site main page is and go to Referrals tab... select 'Promote' and copy Your referral link that looks like this... https://allinoneprofits.com/?id=st3v3n ...and then come back to the Splash Builder settings page... click open the HTML source editor box and paste YOUR personal AIOP referral link where the "Team spirit" rotator link is now.... SEE IMAGE BELOW and Note: very important that the link is between the " " 's with no extra spaces.

45) Click 'update' and then on the settings page... click 'update settings' and then... scroll up top to click the 'View your splash page' button and... click the AIOP 'get instant access' button and on the AIOP page itself... click 'Join' and verify it is YOUR page.
46) Now open a new tab in your browser and log in to your SFclub back office and copy your 'Link to sales video' link that looks like this... https://simplefreedomclub.com/share/rockthebizops&p=video and then paste your SFclub in place of the 2nd "Team spirit" rotator link SEE BELOW (again)... BE SURE to click 'update' and then 'update settings' (again) on the settings page. Scroll up to click 'View your splash page' and verify that it is your SFclub page. (you click Join!)
Note: if you are not a member of SFclub, you skip this step.

47) Now open a new tab in your browser and log in to your Easy1Up back office and copy your 'Sales page' link that looks like this... https://easy1up.com/?id=st3v3n and then paste your Easy1Up in place of the 3rd "Team spirit" rotator link SEE BELOW (again)... BE SURE to click 'update' and then 'update settings' (again) on the settings page. Scroll up to click 'View your splash page' and verify that it is your Easy1Up page. (you click Join!)
Note: if you are not a member of Easy1Up, you skip this step.
48) Rockstar! Now... (again)... click 'update settings' one more time... go up and 'View your splash page' one more time and click on all *3 of the 'Get instant access' buttons and quadruple verify that everything is A-ok!!
49) Grab another beer... :-)
SHARE CODE AND FINAL SET-UP
50) From inside your Splash page settings (page), scroll up top left and click the text link to return to 'splash pages' and then leave this AIOP splash builder open.
51) Return to browser tab for the AIOP site main page... go to TOOLBOX tab and select 'Autoresponder' which will open AIOP Response into another tab (window).... so now there should be a browser tab/window for AIOP Main site, AIOP Response and AIOP Splash builder...
52) Inside of AIOP Response, scroll down the page and click on 'Ready made campaigns'. SEE BELOW

53) On the Ready made campaigns page... scroll down the 'Copy a campaign... and fill the following information...
- Line 1 (Campaign ID) can be anything you want.
- Line 2 (Campaign name) is YOUR NAME *for inside emails!!
- Line 3 (Campaign email) is YOUR EMAIL *for inside emails!!
- Line 4 (User name or ID) is your BiG3 pg. # SEE STEP 54)
- Line 5 (Campaign number) is share code (July2020 code listed)
SEE BELOW (DO NOT CLICK SUBMIT YET)

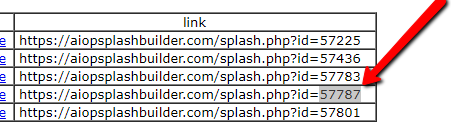
54) the share code above is correct for July2020 funnel... but... you will also need your own "personal" BiG3 pg. ID# to enter as YOUR (User name or ID)... so, take a minute to go back to your AIOP Splash builder... and where your new BiG3 page is listed... you will copy YOU personal page ID# as shown and then enter that as YOUR (User name or ID) SEE EXAMPLE BELOW
!! THIS WILL ALWAYS BE YOUR (User name or ID) FOR OFFICIAL R0CK FUNNELS - ONLY !!
(THIS LOADS YOUR BiG3 PAGE WITH YOUR LINKS INTO EMAILS) this is not a share code.
NOT DONE YET
56) Now that you filled in and clicked 'submit' the funnel basic info. and have returned back to main AIOP response page... it should be looking something like this... SEE BELOW

58) THE FINAL TOUCH... returning back to this same section (as above)... you will click on the blue text link (center in pic.) that says click 'here' to edit. Which will open this page... SEE BELOW

58) Add your own personal BiG3 page link into the box red arrow 1 and then click 'change' red arrow 2. THIS WILL SET THE WELCOME PAGE TO SHOW YOUR BiG3 PAGE. Note: the other page link (shown above) is the 'confirmation' Thank You! (please check your email) page. Leave that link as-is.
59) and now Finally... scroll back to top (left) on this same page to the 'campaigns' tab and select 'edit campaigns'.
60) This will return back to the main campaign page... where you will now... copy/paste one of the new capture page links into the browser and YOU WILL OPT-IN to "test" and verify that... opt-in form works?.. opt-in directs to 'guitar guy' Thank You! page?... check your email and verify that 'confirmation' email delivered?.. when you click 'confirmation link' in email... it directs to your BiG3 page?.. after you exit that view... has email #1 delivered to your inbox?.. click on ALL links in email to check that... team blog link is correct?.. that your Big3 page links are ALL correct?.. that the Team facebook link is correct?... that YOUR NAME and email are displayed correctly?... does the subscriber name up top display correctly?..
YES?!?! ~ #RockOn!.. Now, go get your ads in gear...
THE END


hey whrere is my beer
ReplyDeleteHa ha :-) and mine too!!
DeleteLikewise
DeleteThanks, I set it up without any problems
ReplyDelete:-) #RockOn !!
DeletePlease review step 49 several times!
ReplyDelete:-) ditto...
DeleteAll Done
ReplyDelete